This section allows you to view all posts made by this member. Note that you can only see posts made in areas you currently have access to.
Messages - CR21
91
« on: December 01, 2016, 07:07:07 AM »
Just a quick update: I have made some progress on the other frame modifications, drawings are all completed for the rear sets ready for Christmas manufacture and replica pegs have been ordered. The oil tank mounting on these bikes are a little fiddly, this is what I make of it so far: The oil tank is 'suspended' into the frame, it is hung from the top from two L-shaped brackets and rests on rubber seats on the bottom supported by more L-shaped brackets either side like the reference image below: 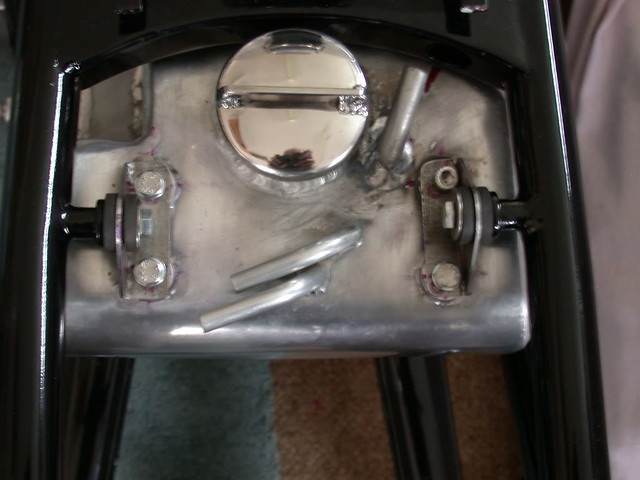 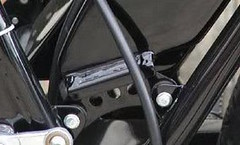 Top mounting brackets (to be modified for a more triangular profile).Waiting for grommets to arrive to complete the profile:  Bottom brackets:   With the help of a member from the CB750 forum who has built a fantastic replica, I have managed to obtain measurements from his CR750 catch tank. Another piece of the jigsaw! Modelled up in CAD for future reference. This will be fabricated in Aluminium. 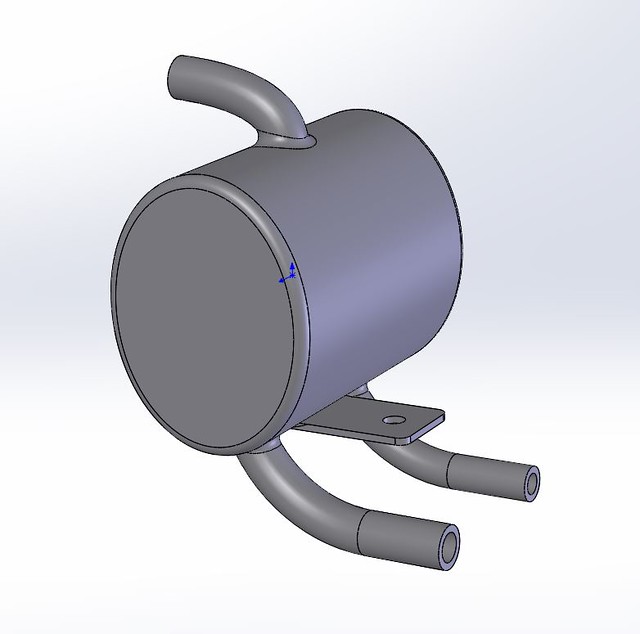 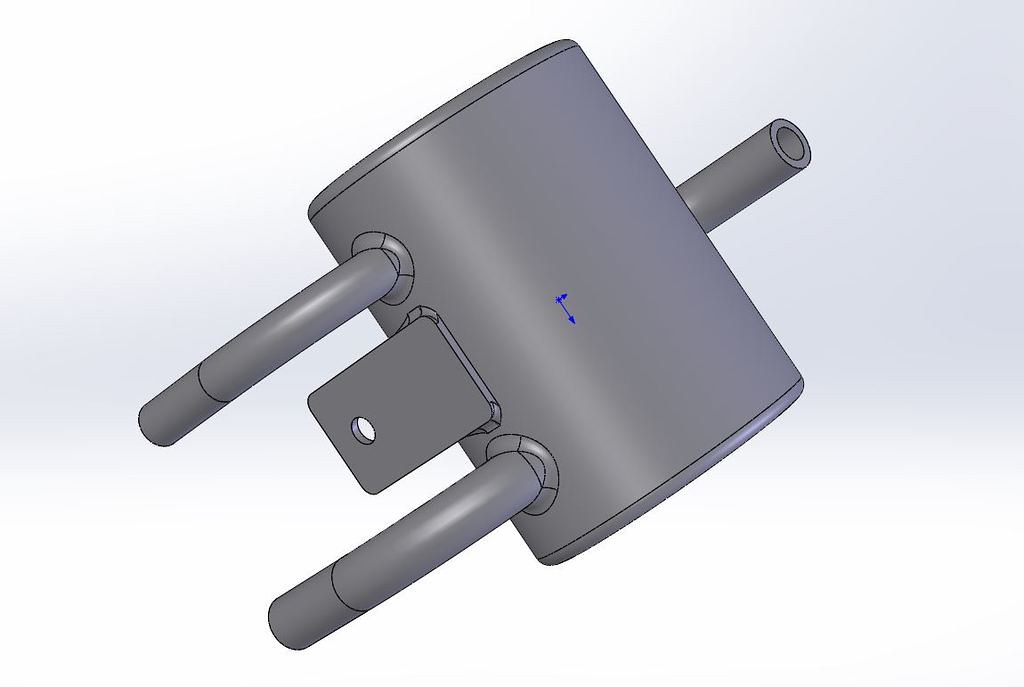 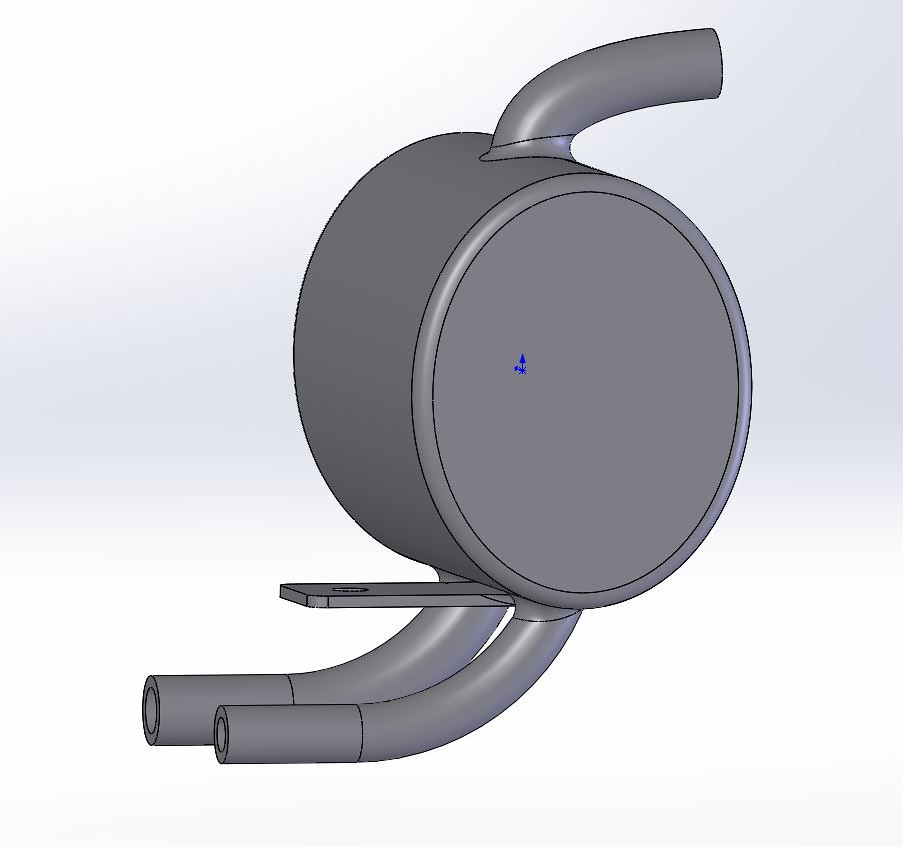 That is all for now, Cheers CR21
92
« on: November 17, 2016, 10:33:04 PM »
Hi guys, Thanks for the replies. There are some extremely high-quality builds on this forum, and a lot of fantastic support. If this build can come out anywhere near some of the builds I have seen on this forum I will be chuffed  Cheers! CR21
93
« on: November 16, 2016, 09:14:36 PM »
To progress with the CR750 rearsets, I worked from a number of images and sketches that I have been collecting over the last two years. It appears that there may have been two types of CR750 rear sets available with the kit originally supplied by Honda. Both types were folding, one sprung and one un-sprung. I have decided to go with the un-sprung set for simplicity, and I am not entirely sure if the sprung units I have seen are replica parts or original parts. I can also get a nice replica set of footpegs from an American supplier. As mentioned in my post above, the rear-set ‘boss’ is a relatively simple form, that will be machined from steel, cut from one direction, then spot faced, drilled and tapped for the bolt. I had toyed with the idea of making the entire rear-set machined, as the profile is very simple and there is machining to be done on the part anyway, however to be faithful to the original bike I will fabricate the hanger from two sheet metal halves. These halves are just simple folded profiles that are butt welded to form a central seam, and then the boss is welded into position around the perimeter.  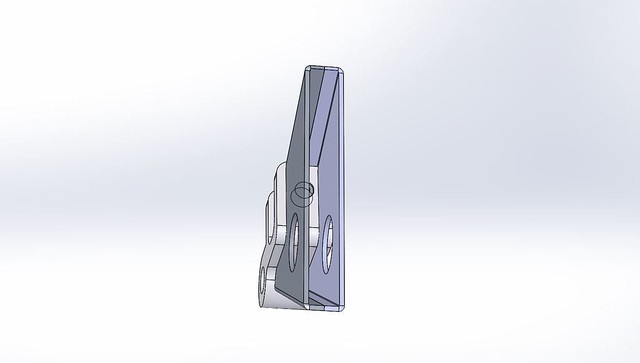 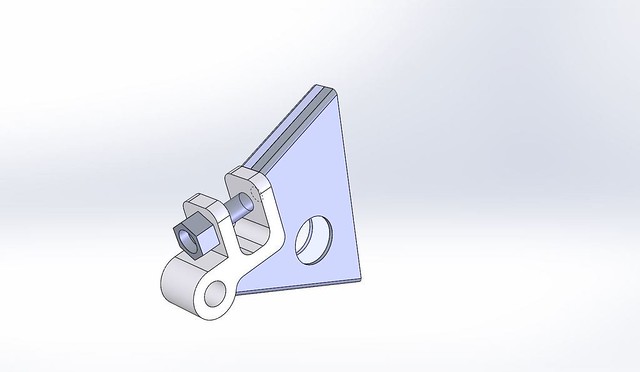 In order to save on fabrication time, I have modelled up the rearsets in a CAD package. These are very simple parts to model but this allows me to consider bush tolerances for the peg, and also the ‘flat pattern’ for the sheet metal work. When modelling these parts in CAD I start off with a flat sheet, mark out bend lines and generate the bends, very much like the manual process at a bench with marking blue and a fly press, but in the digital form. 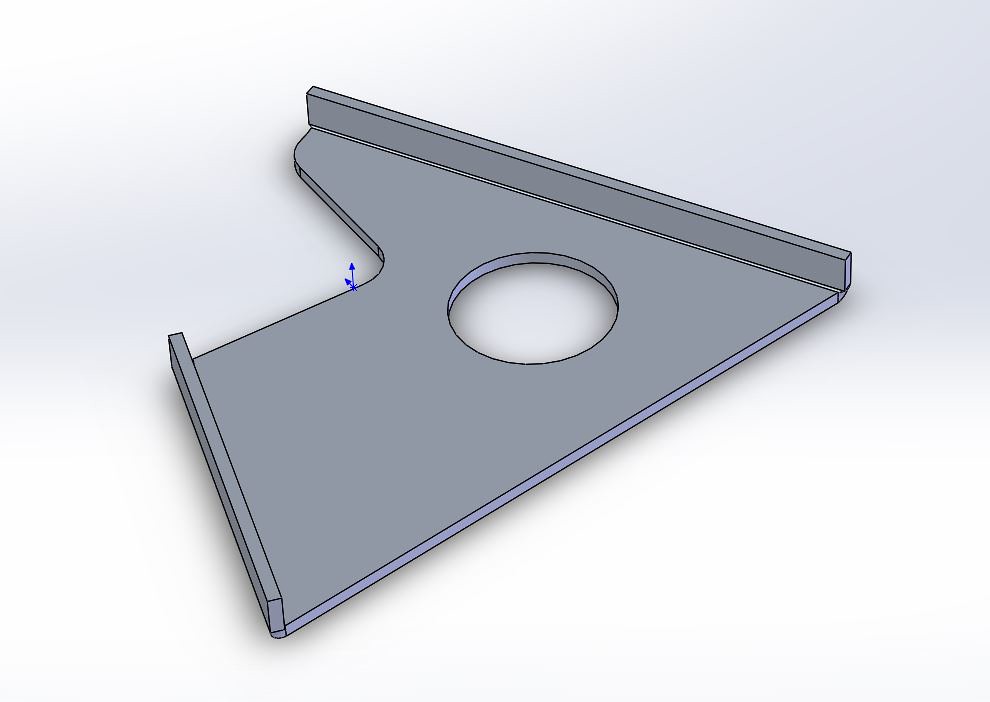 This digital CAD model can then be ‘flattened’ to give me a profile to work with with bend lines in the correct places, which will untimely save time and head scratching when fabricating and will allow me to fabricate the parts as I intended and have planned. Of course these parts should then fit nicely around the boss for welding into place. Overkill yes on such a simple part – but it is good to try these things out, and with the angles involved to interface with the frame, it should prevent errors.  I will follow the same process for the frame brackets, which will also allow me to build up an inventory of drawings and models for reference. Cheers, CR21
94
« on: November 16, 2016, 09:10:57 PM »
This thread has been very quiet for a while... But I have been doing a huge amount of research, and have become somewhat CR obsessed! Picking back up on the tank strap: I have managed to source the correct rubber part to fit in between the steel bands, and have ordered some stainless steel rod to allow me to make my own replica tank strap. Frame modificationsThis research is what I have been whittling away at ready for a Christmas frame altering session. This is the list so far: - De-lug all road mounts. - Fit machined and fabricated rear sets. I have produced a CAD model and drawings for the rear sets, which like the image below have a 12mm thick boss, which houses the footpeg and mounts for the brake pedal and exhaust. This part is welded in-between two folded sections to create a triangular bracket. These 'inserts' will either be waterjet cut or I will machine them. Luckily I have managed to get hold of a sketch with measurements from a kit bike to be able to accurately place the rearsets onto the frame. 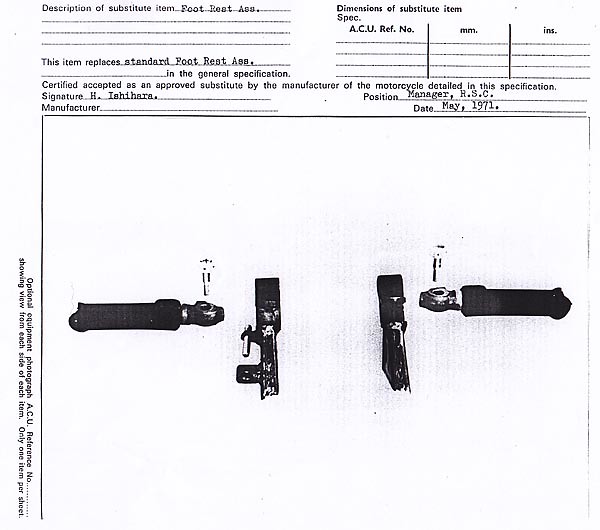  On these rearsets I am going to mount a set of replica aluminium pegs with the all important cured rubber over moulded grip. These are replicas cast from the original parts, with a bronze bushing pressed into them. They will be held into place by a custom 'replica bolt' which I will turn up. Replica footpeg clamping bolt CAD:  Onto these rear sets mount the rear exhaust hangers, the brake pedal again a cast item with a rubber over moulded grip. The footpeg mounts through a bush, and depending on the gear set-up is on the left or the right side. The rear brake is cable operated with a large and very complex cable, a cable stop will be placed onto both rearsets to allow for both left and right gear changes. Replica Brake cable 'stop':  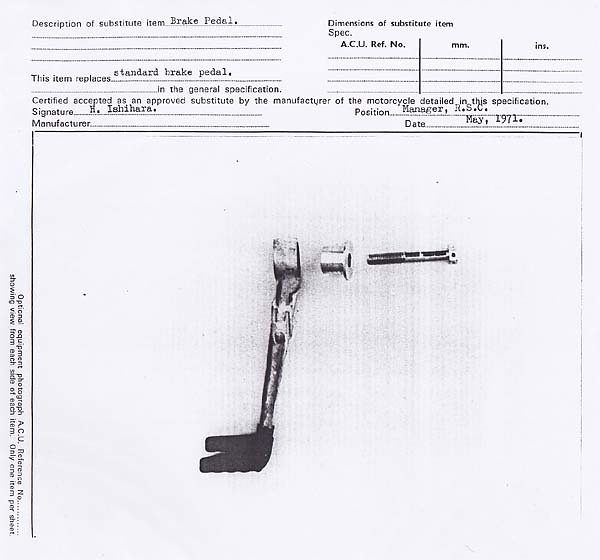 The left gearchange is simple, as it uses a conventional style pedal in reverse from the output shaft. However the 'special' gear change option was to have a changeover shaft for British racers, this comprises of a linkage assembly, bearing holders and another frame modification to house an olive bush. This is a modification that I would like to fit at a later date so this is another frame modification.  The fuel tank mountings are fairly simple, it mounts at the front with the original HONDA rubber mounts, and at the rear it is held in with the replica strap. The frame is modified with an added 'Arc' which braces the frame for the tank strap, and provides a mounting point for the front of the seat. Again I have managed to acquire a drawing for this part  The rear of the frame is cut off, and the seat support loop is lowered. I may also add a rear frame loop as well if I feel that the seat requires supporting. Other frame mods include an additional steering damper (a simple flanged plate that fits ontop of the lower yoke around the left fork tube and is secured by sharing the pinch fork pinch bolt) the other end of the damper fits to the frame rail underneath the tank with a clamp, a detail that is still to be resolved. FairingThe fairing is mounted in three places, at the headstock with the conventional 'pinched tube' onto a bracket, either side of the engine mounts to support the rear of the fairing, and on the frame rails by the headers to support the lower front part of the fairing (I believe this was a modification rather than being original however I don't want the fairing flapping. I have managed to get a set of accurate rear fairing brackets that bolt onto the rear engine mounting plates, which again are really nicely made parts and are supposedly very accurate, similar to the ones below but detailed in a different way:  [/url] The front 'main' fairing bracket that I have purchased is a 'tribute' part that is relatively close to the original, however I may make my own/try to source a more original one further down the line. The fairing has been a real head-scratcher, as many replica fairings just do not look right in my eyes, this could be down to decal placement, or even the fitting of the fairing itself, I am really unsure. This led to contacting many people that have built replicas including some self-confessed classic racing Honda 'Anoraks' in order to trace down a good replica fairing. I eventually traced down a fairing from a supplier in London and the story says that he purchased the moulds from a guy who made the mould from a 'Genuine CR Daytona fairing' so it should be pretty spot on. I am happy with the shape, and it seems to be the best that I can find. Listening to various recommendations from different people who have built accurate replicas seems to be the way forward with this build, there is a wealth of knowledge of these bikes that simply did not exist during the TA125 build and it is a real help. After looking at many available seats on the market I was not really happy with any of them, the Meadspeed unit seems to be reasonable quality but the shape is wrong. The only seat that I did like was the Airtech seat but with shipping and a swab base it becomes a ludicrous amount! Luckily I have managed to track down a guy who has a seat mould, supposedly taken again from an original Honda racing part. The aim is to borrow the mould and create a seat for my bike potentially from Carbon  which would be great! WheelsThe front wheel aside from having the double disk conversion is pretty straight forward. The hub will be turned down to remove the central cast ribs to resemble the original magnesium CR part. The rear hub is a point of discussion of these CR bikes. Originally the CR had a twin leading shoe, cable operated brake cast in magnesium, a real work of art and a focal point of the bike. Sadly these hubs were only ever made in very small batches, and any replicas are also made in small runs and are massively expensive from £3500 upwards  For me this is a step too far financially, and I will be finding an alternative way of achieving a similar look. There is a company in America who are making a replica back plate to fit the standard K series CB750 hub, however this is still in development and again is not cheap. I think I will try to work out a way of mounting a cable boss to the existing brakeplate unless a replica part becomes financially viable. ExhaustsI think that a good chunk of the CR appeal comes from the exhausts, not only the sound but the look of the original 'Swept' pipes. After researching this topic it appears that there is only one supplier who makes these exhausts properly, hydroformed with a welded seam, complete megas with a reverse cone and smoothly bent header pipes they really are a work of art! Made by Simon Tappin, these will be going on my bike! 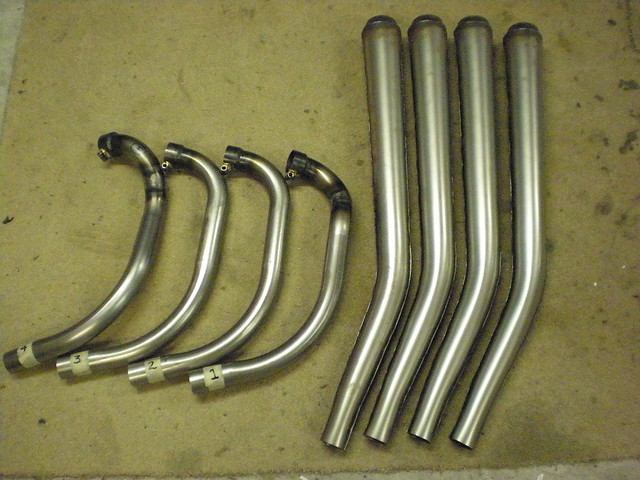  Clip on handlebars Clip on handlebars The original CR clip on handlebars were hinged around the yoke and clamped into place by a pinch bolt, this was for ease of disassembly without the need to remove the top yoke. As far as I know nobody makes a replica clip on, and as I want clip ons as close to the original I am going to have to make them myself! "Why" You may say when standard clip ons that will do the same job are less than £100? Well it's the details that will hopefully make this bike, and it is a good challenge for me to get stuck into! The original CR clip ons were a two-piece clamp, cast in Titanium and then had a tube attached to the casting to form the handlebar. I doubt I wil be using titanium, however I will aim to make the parts as light as possible either in a racing steel or aluminium. In order for the master cylinder to clear the clamp on the right unit the clip on needs to be angled and kinked to prevent a clash. I have drawn the parts up using a CAD program to be able to create the design, look at tolerances and of course check the clearance angles with the master cylinder. 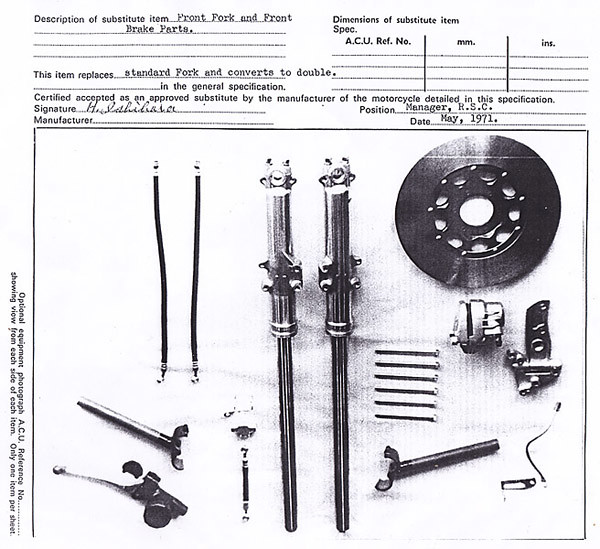 RHS CLIP: 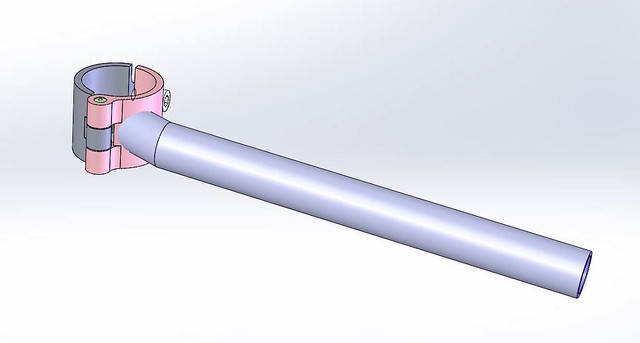 LHS CLIP: 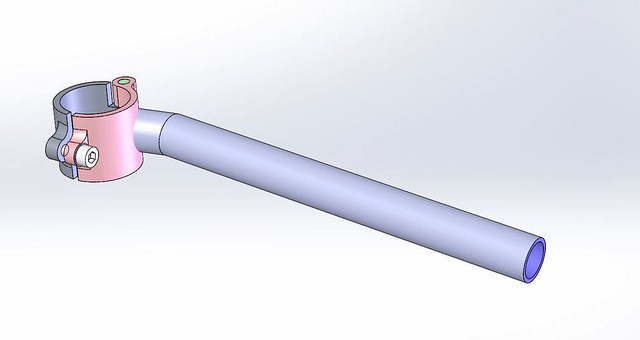 All in all the preparation seems to be going well for the frame modifications at Christmas Full steam ahead! I have referred to people without naming them in this post quite a lot, and this is because most of them are not part of forums or even online at all. I have been overwhelmed with the help and enthusiasm from suppliers and people who are in the Honda scene, thanks to you guys if you are reading this! Cheers, CR21
95
« on: October 12, 2016, 01:14:43 PM »
Here is the twin disc guide that I used, I found it a very easy job, people on various threads in the states seem to struggle, not at all sure why, maybe we're cleverer than our Yankee friends? 😄, make sure that you use a master cylinder that is designed for a twin disc setup, i used one from a 97 fire blade , works well but maybe wouldn't suit your bike as I think your going for a more original look, GL1000 master cylinder may be better for you, yes the mead speed seat looks nothing like the original, I used it because I needed somewhere to hide the battery, the original CR had a tiny tail cowl.
http://www.dotheton.com/forum/index.php?topic=1525.0
Hi Mark!
Thanks for the link, I have already linked from a thread from this forum (may be your build thread) its very useful. That may be the case
Cheers for the heads-up on the master cylinder, I was planning on using a GL1000 one.
Tricky one the seat as I am after one with a cover/seat swab as trimming can soon get very expensive! I have a Meadspeed unit that I picked up but I am not sure if I am going to use it.
What ignition did you use Mark? I was thinking of using the DYNA total loss system.
Cheers!
CR21
I used the piranha system that was on the donor bike, god knows how old it is but it works, but I've kept the alternator etc because mine is for road use, I assume that you are removing your alternator to be closer to the original?
Hi Mark, I see, I have seen the piranha systems on Yamahas but I have never used them. I run a PVL style total loss on my TA125. Yes the alternator will go I just need to decide what ignition set-up to use. Really it will depend on reviews and price - I need to do some research Cheers, CR21
96
« on: October 12, 2016, 09:36:37 AM »
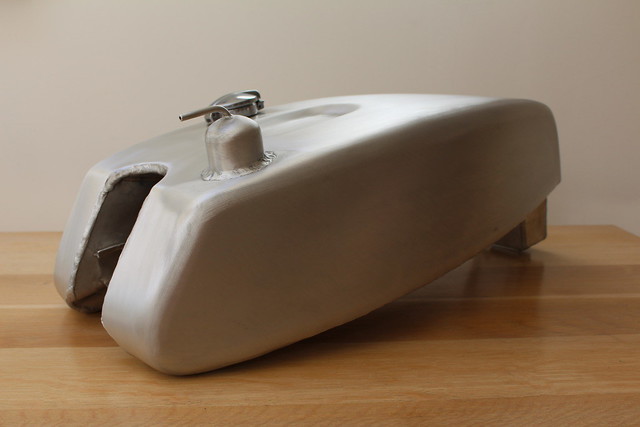
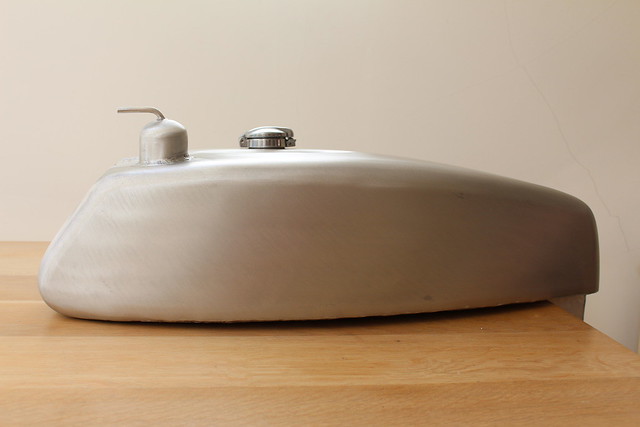
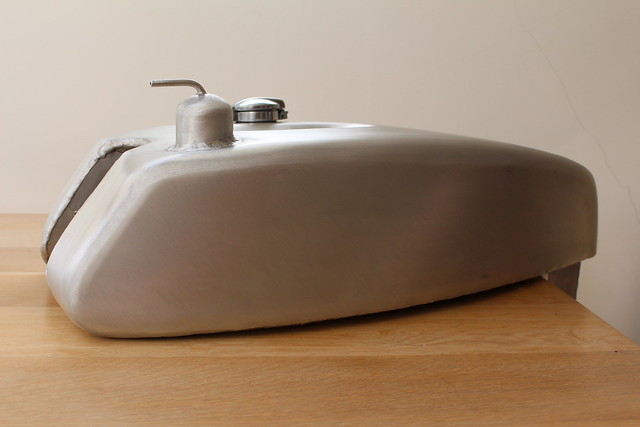
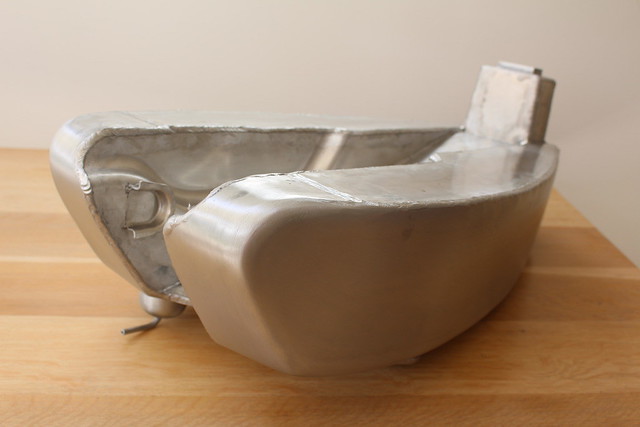
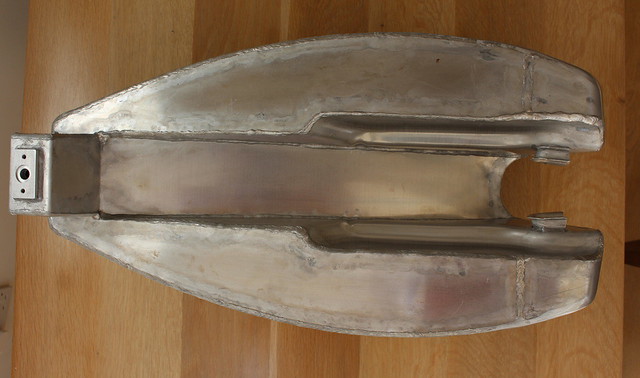
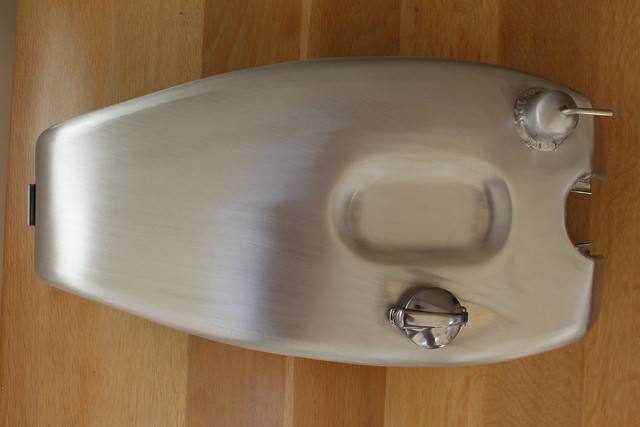
WOW i have to say the petrol and oil tank are a work of art
What do other people use for the strap
pete
Hi Pete, they are the maker is a true craftsman! Other people have used the Yamaha strap in the past, or the reproduction one, Cheers CR21
97
« on: October 11, 2016, 11:13:31 PM »
Here is the twin disc guide that I used, I found it a very easy job, people on various threads in the states seem to struggle, not at all sure why, maybe we're cleverer than our Yankee friends? 😄, make sure that you use a master cylinder that is designed for a twin disc setup, i used one from a 97 fire blade , works well but maybe wouldn't suit your bike as I think your going for a more original look, GL1000 master cylinder may be better for you, yes the mead speed seat looks nothing like the original, I used it because I needed somewhere to hide the battery, the original CR had a tiny tail cowl.
http://www.dotheton.com/forum/index.php?topic=1525.0
Hi Mark! Thanks for the link, I have already linked from a thread from this forum (may be your build thread) its very useful. That may be the case Cheers for the heads-up on the master cylinder, I was planning on using a GL1000 one. Tricky one the seat as I am after one with a cover/seat swab as trimming can soon get very expensive! I have a Meadspeed unit that I picked up but I am not sure if I am going to use it. What ignition did you use Mark? I was thinking of using the DYNA total loss system. Cheers! CR21
98
« on: October 11, 2016, 01:13:14 PM »
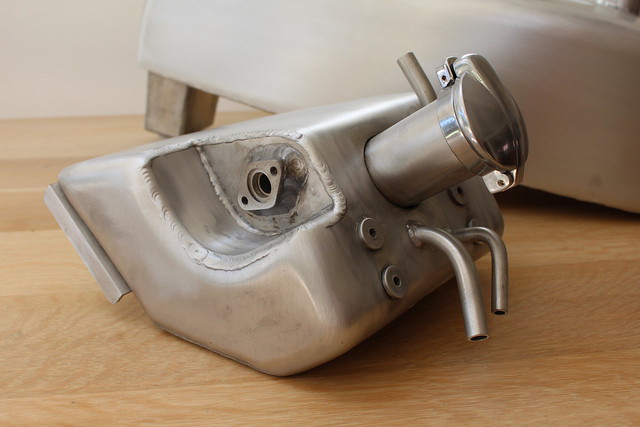
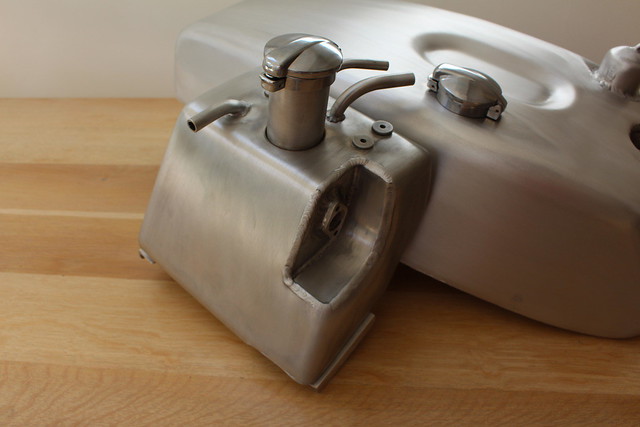
So the build is progressing slowly. I am currently searching for the following: - CR750 original style tank strap. - CR750 RC seat (not sure about the meadspeed unit) The fueltank is strapped into place on the rear of the tank only, the front is held in with rubber mountings. Unlike the Yamahas which are often strapped front and back. The difficult thing is getting hold of a ‘replica’ fueltank strap to be able to do the tank justice! I could use a Yamaha part that would work well, but I would rather not. Just to add detail to the build and some originality. The only thing I don’t like about the RC style strap is that the bare steel loop of the strap sits onto the aluminium tank so I think I may have to sheath this somehow. I can make up the stainless parts by hand bending however the challenge comes with the rubber part! 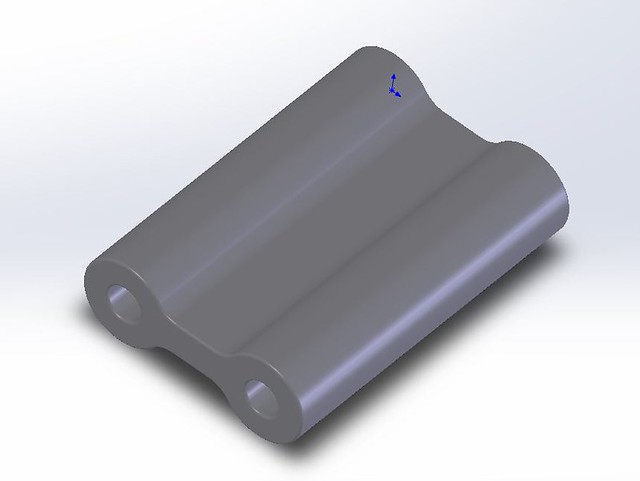 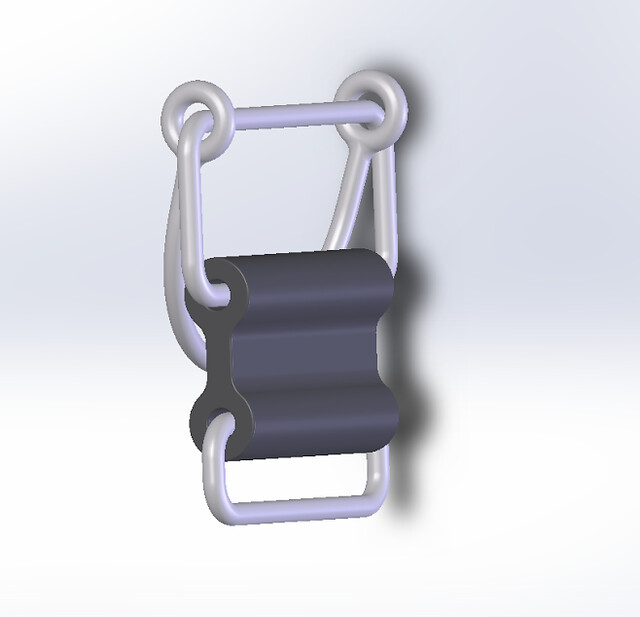 Stock extrusions exist but after quite a bit of research there is not a suitable stock part that I could use…. This type of part would have been overmoulded over the wire sections, which is expensive. As well as moulding, extrusion is an option for manufacturing this part however again there is a tooling cost associated with this, and it is high as I would only want a very low volume of parts. A company named ‘CR750 RSC - Works Motorcycles & Parts’ who I came across on Facebook make a replica strap that is close to the part that I am after however I would like a go at making one myself. Some of their other products are fantastic including frame kits and machined parts – well worth a look! This is the replica strap available, similar to what I would like to achieve: 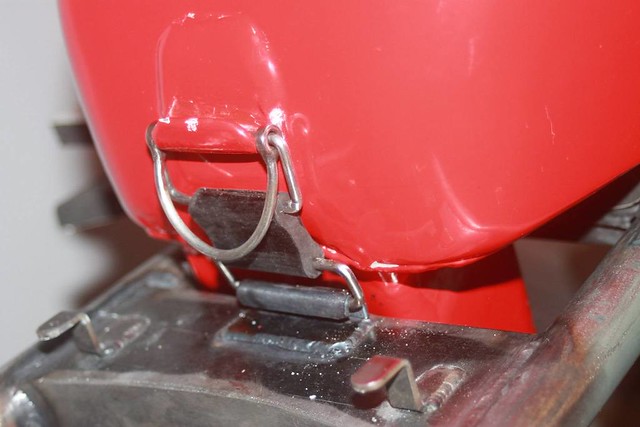 I have ordered some stainless bar to have a play with bending it, I also ordered up a few Yamaha straps to see if any of them are close to the part I am after and could be utilised/modified. When I get fed up of trying to sort this out I will just order the available part and see if I can tidy it up? I have some time booked off over soon, and I intend on building the twin disk front end up, de-lugging the frame and adding the seat and tank mountings so that I can finally look at the tank on the bike and get stuck into the project! Cheers! CR21
99
« on: October 11, 2016, 12:59:50 PM »
Hello,
I am after an CR750 seat unit (RC style). I notice that meadspeed make one but I am not sure about the 'long' profile. Does any forum member know of a supplier for CR750 seats?
I am also on the lookout for CR750 original style tank straps.
Thanks!
CR21
100
« on: October 05, 2016, 08:07:09 AM »
Good news the painter has managed to get YR-1C, it's being painted next weekend so I'll post some pics when its done.
Hi Mark - how did this turn out? I am currently on the hunt for a colour match! Thanks, CR21
101
« on: August 27, 2016, 09:45:23 AM »
Very nice, are they from mr Boyce?
They certainly are
102
« on: August 26, 2016, 09:58:40 PM »
103
« on: July 27, 2016, 05:46:32 PM »
Thanks for the replies, all help is useful so the offer is much appreciated. I am aiming to pick the project back up in September Cheers CR21
104
« on: May 14, 2016, 11:14:08 PM »
Good luck with your build, I got mine on the road last week although it's a long way from finished ,for example it currently has a 4 into 1 and Honda racing colours instead of the CR paint job and 4 into 4, I can however report that they are great fun to ride and the twin disc set up works well, Ive lost count of the amount of people that have stopped me to talk about it at petrol station/traffic lights etc, so be aware it will attract a lot of attention when you have finished it!, as I said good luck I hope it goes well.
Hi Mark, I have been following your build. Fantastic work I am glad you have it ready for the summer Cheers CR21
105
« on: May 14, 2016, 10:12:06 PM »
So the build begins! I have been wanting to undertake another project since the TA replica I took on over three years ago, this is due for its final commissioning at the end of this month where it will be put through its paces on the dyno (worried face!) Since I began the TA125 build, I have become fascinated by the world of 70s race bikes, the history, stories and machinery of that era are very intriguing. This led me on to discover a machine which I did not know a huge amount about, of course its roots are from the CB750 a bike in itself has left a very prominent flag in motorcycling. The CR750 A beautiful build of a previous replica, used for inspiration!   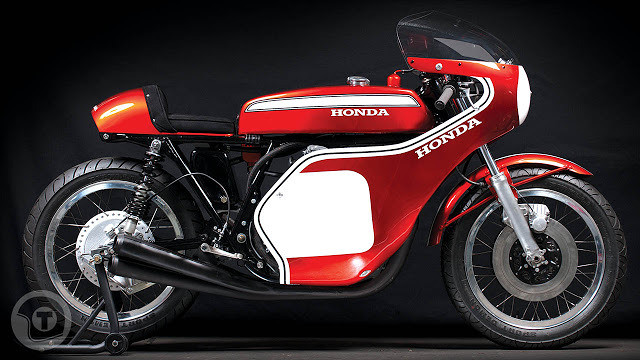  To be honest at first the CR750 appealed to me completely on an aesthetic level, just look at it! The lines of the pipes, the tank, the fairing lines and the stance of the bike. This winning the Daytona ridden by Dick Mann in 1969 must have been an incredible sight. To cut a long story short, I want to build a replica. This will by no means be an "unlimited budget" replica, alike some bikes that have been built. But it will aim to be as "accurate" as the budget allows, fabricating and sourcing replica parts as I go along will hopefully keep the budget on track. I had anticipated that this build was going to have to happen some time ago, when I decided to place a deposit down on a fuel tank. Having previously constructed the replica tank for my TA125, I contemplated fabricating a tank for the CR replica however after seeing ASA MOYCE'S beautiful work, he was the only man for the job. Last year I paid a deposit in order to be on the waiting list, of which the build slot is slowly approaching around July.  After committing to the project and a fuel tank I then needed to source a bike! If any forum member happens to have this kit of bits boxed up in the loft, please get in touch 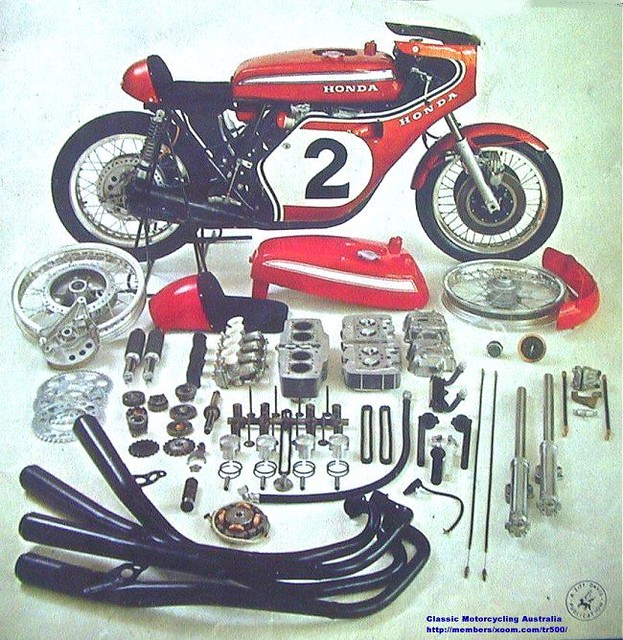 After many weeks searching around and bidding on bikes which went way out of my budget, I decided to price up building the CR750 "basis" (CB750 rolling chassis + engine) from parts. This came in at about the same cost as some of the project bikes. I generally have the attitude that some original bikes with patina should not be modified, so could not face "cutting up" a good one. I searched and searched, and ended up buying a CB750 K4 USA import, this had; non-standard pipes, different forks, repairs needed doing to the frame and crankcases, a few modifications. But all in all a fairly original bike which I could face stripping for the starting block of the CR build. I stripped the bike one Saturday, and all of the parts that were not required (most of the bike) were sold off online, mainly to members of the Honda forums. This made the "donor bike" a little more affordable. I intend on fabricating my own replica parts that I deem to be too expensive from some suppliers, and using other fantastic suppliers for accurate components such as the tank and exhausts. There is a huge amount of information out there regarding the CR750s, I have found out more information on the CR750 in one evening than even exists on the TA125 so I feel that although this build is larger and will cost a lot more than the TA, the information and fellow enthusiast group will be a great help. I have been emailing a few different experienced builders of these machines, some of which have been extremely helpful so far so thank you guys it's much appreciated. The donor bike in all its glory, what a beast of a bike! CB750 K4: 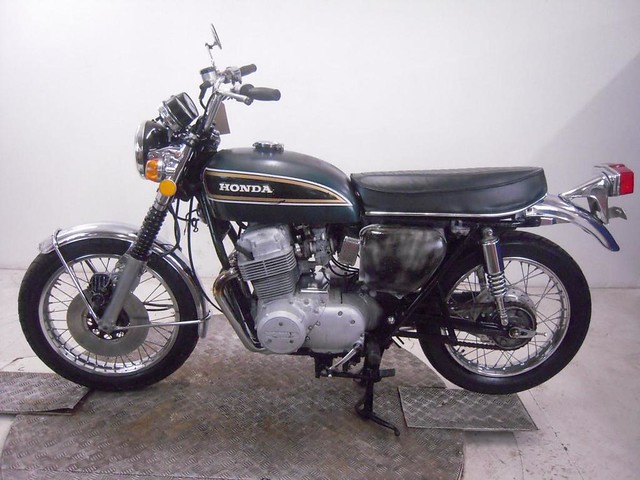 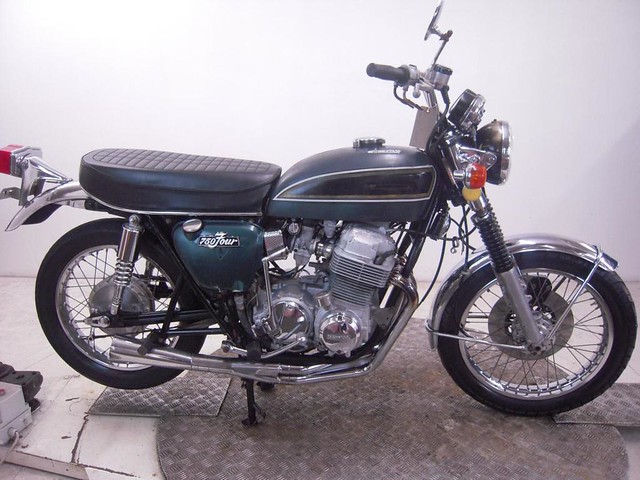 Now stripped to leave the rolling chassis:  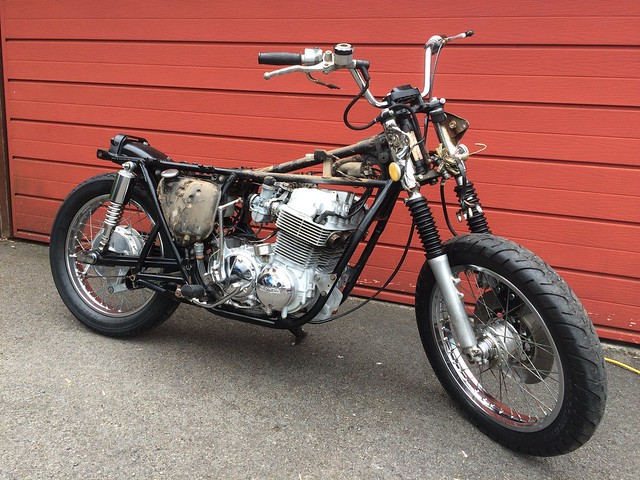 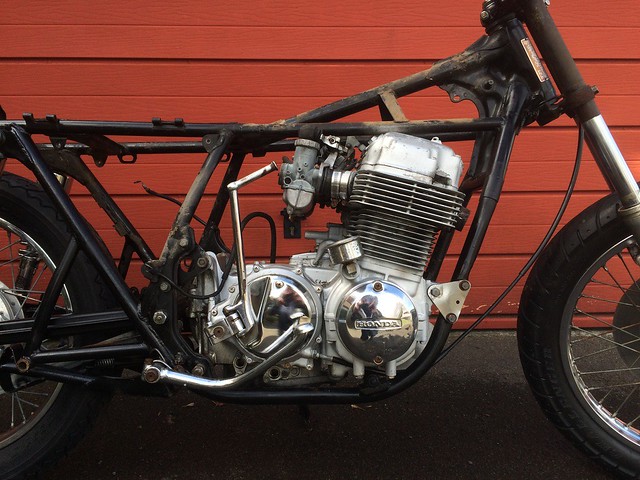 During the strip down I was very pleased with how everything has come off of the bike, and how original the bolts and small components have been, which will hopefully be reflected inside that big engine. Of course there are a few hurdles: - the chain has damaged the crankcases at some point in the past and this has been repaired with epoxy (will be cleaned, dressed and delivered to a local master aluminium welder!) 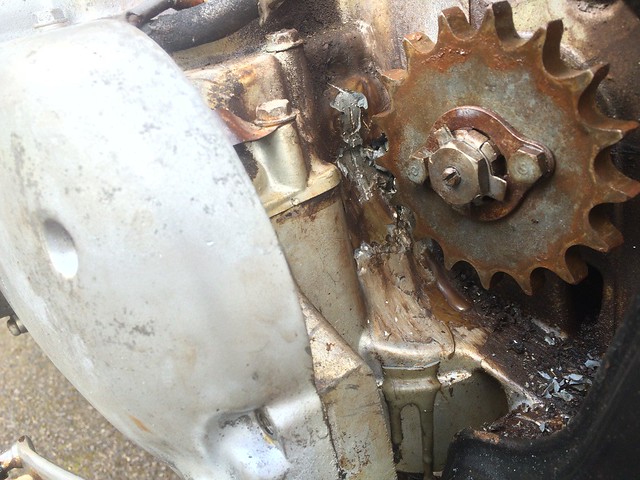 - Some cowboy repair merchant was seeing double when fitting a side stand in the past: 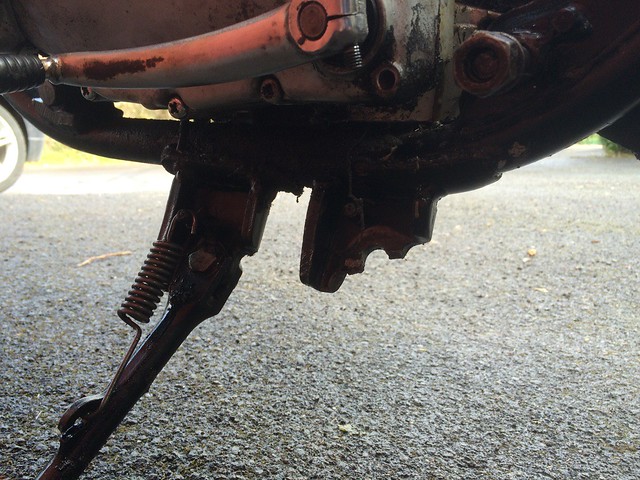 But all in all I feel that it should make a good basis, and as some of you may have noticed, the front end has previously been swapped for an earlier set-up. There is no sign of accident damage to the frame. However this is another reason I was interested in this bike, as I wanted to run the early fork/brake set-up as it is more sympathetic to the original CR look. I have managed to source the opposing "mirrored" caliper bracket in order to run the dual disk set-up. This is a fairly rough casting but I feel it will clean up relatively well. This will allow me to mount the "original style" CR front mudguard to the bike. As fork stanchions are relatively easy to get hold of I will be replacing these with pattern ones. However I am still on the lookout for a second caliper. And some drawings/measurements for a CR mudguard. -- I will be documenting the build of this bike in two locations. On the air-cooled RD forum (where the TA125 replica build thread is) and on the SOHC HONDA U.K forum. I received a huge amount of advice from the members of the air cooled Rd forum and if it is welcome on the forum I would like to keep people posted on the "next project" (apologies it is not a YAMAHA!) I think that is enough rambling for now, here goes another long build  I can't wait! All the best, CR21/RD17
|